


How To Use Ableton 10 Wavetable Part 2
- Feb 20, 2018
- 2 min read

Let's pick up from where we left off with Ableton Live 10's awesome Wavetable.
Filters
In the filter section we can expect a lowpass, highpass. bandpass. notch and a morph filter. We have 12 and 24 DB slopes available to use same as Ableton's beloved Auto filter.
The Clean circuit is very CPU friendly, same goes for the OSR state variable type and it's fellow options. There is an additional Drive control that can be used to add gain or distortion to the signal before it enters the filter.

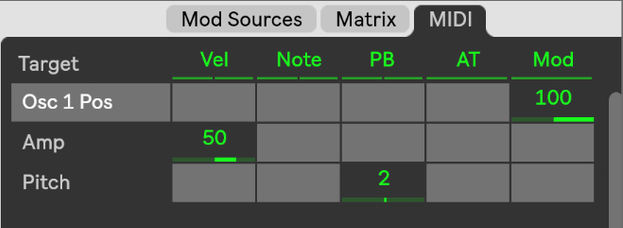
Midi Tab
Not forgetting that all of this is highly mappable by assigning midi to parameters and turning your wavetable into an awesome instrument!
You have velocity, Note, PB, AT and Mod at your beck and call.
Velocity uses the incoming midi notes velocity value to create movement on target parameters for the length of that note. As with most controllers, you have pitch bend, aftertouch and the modulation wheel, however, if you don't have these, you can still create movement with clip envelopes.
Global and Unison Controls
As we know by now, global controls affect the entire instrument rather than selected parameters.
In wavetable, you have Transpose which effects pitch and we can also use semitones.
Volume will affect the overall volume of the instrument, you have options on poly/mono giving you the choice of single voices v multiple. There is also a multiplicative modulation destination.
The poly voices drop-down menu lets you set the maximum number of notes that can be played at the same time. Glide effects how the notes slide into each other regarding their pitch, and it's worth mentioning that glide is only active when the poly/mono switch is set to mono.
There are 6 unison modes, and unison is a combination of, multiple oscillators, stereo locations and waveable positions. You have classic, shimmer, noise, phase, sync, position, spread and random note. If you wish to increase the intensity of the unison effect, use the amount slider, whereas if you wish to increase the thickness of your sound, setting the number of oscillators per wavetable, use the voices slider till the desired result is achieved.
Here is how Ableton breaks these down:
•Classic: the oscillators are detuned with equal spacing and panned to alternating stereo channels.
•Shimmer: the oscillator pitches are jittered at random intervals, giving a shimmering reverb-like effect. A small amount of wavetable offset is also applied for extra fullness.
•Noise: pitches are jittered as in the Shimmer unison mode, but at a much faster rate, resulting in noisy breathy textures. A small amount of wavetable offset is applied for extra fullness.
•Phase Sync: the oscillators are detuned as in Classic unison mode, but the phases are synced when a note is started giving a strong sweeping phaser-style effect.
•Position spread: the wavetable positions for each oscillator are evenly spread out by an amount. A small amount of detune is additionally applied for extra width.
•Random note: the wavetable positions and detune amount for each oscillator are randomised each time a note is started.
Comments